Welcome to the user manual for Ditel Broker, a platform built to manage devices in industrial environments over the MQTT protocol.
What is MQTT?
MQTT (Message Queuing Telemetry Transport) is a lightweight messaging protocol based on a publisher/subscriber model, designed for unreliable, low-bandwidth networks. It's widely used in IoT and industrial applications for its efficiency and reliability.
Main components
Publisher: The device or application that sends data or messages to a communication channel called a topic.
Subscriber: The device or application that receives the messages published on a topic it is subscribed to.
Broker: The server that receives every message from publishers and distributes it to the matching subscribers.
What is a Topic?
A topic is a hierarchical string that identifies a communication channel within the MQTT broker. In Ditel Broker, topics are structured like this:
For example: usuario@ejemplo.com/sensor_temp/ABC123456
This lets us organize the data by user, device type, and unique serial number.
Quality of Service (QoS)
MQTT lets you define different quality-of-service levels for message delivery:
QoS 0: "At most once" - The message is delivered once with no confirmation. Delivery isn't guaranteed.
QoS 1: "At least once" - The message is resent until confirmation is received. It may arrive duplicated.
QoS 2: "Exactly once" - Guarantees the message is delivered exactly once with no duplicates, using a more complex message exchange.
Connection details for Ditel Broker
To connect your device or application to the Ditel Broker MQTT server, use the following parameters:
Servermqtt.ditel.es
Port1883 (no TLS encryption)
UserYour registration email
PasswordSame one you use on the website
Although MQTT doesn't encrypt data by default on port 1883, in Ditel Broker every authentication is protected with secure credentials, which blocks unauthorized connections.
Client Area Overview
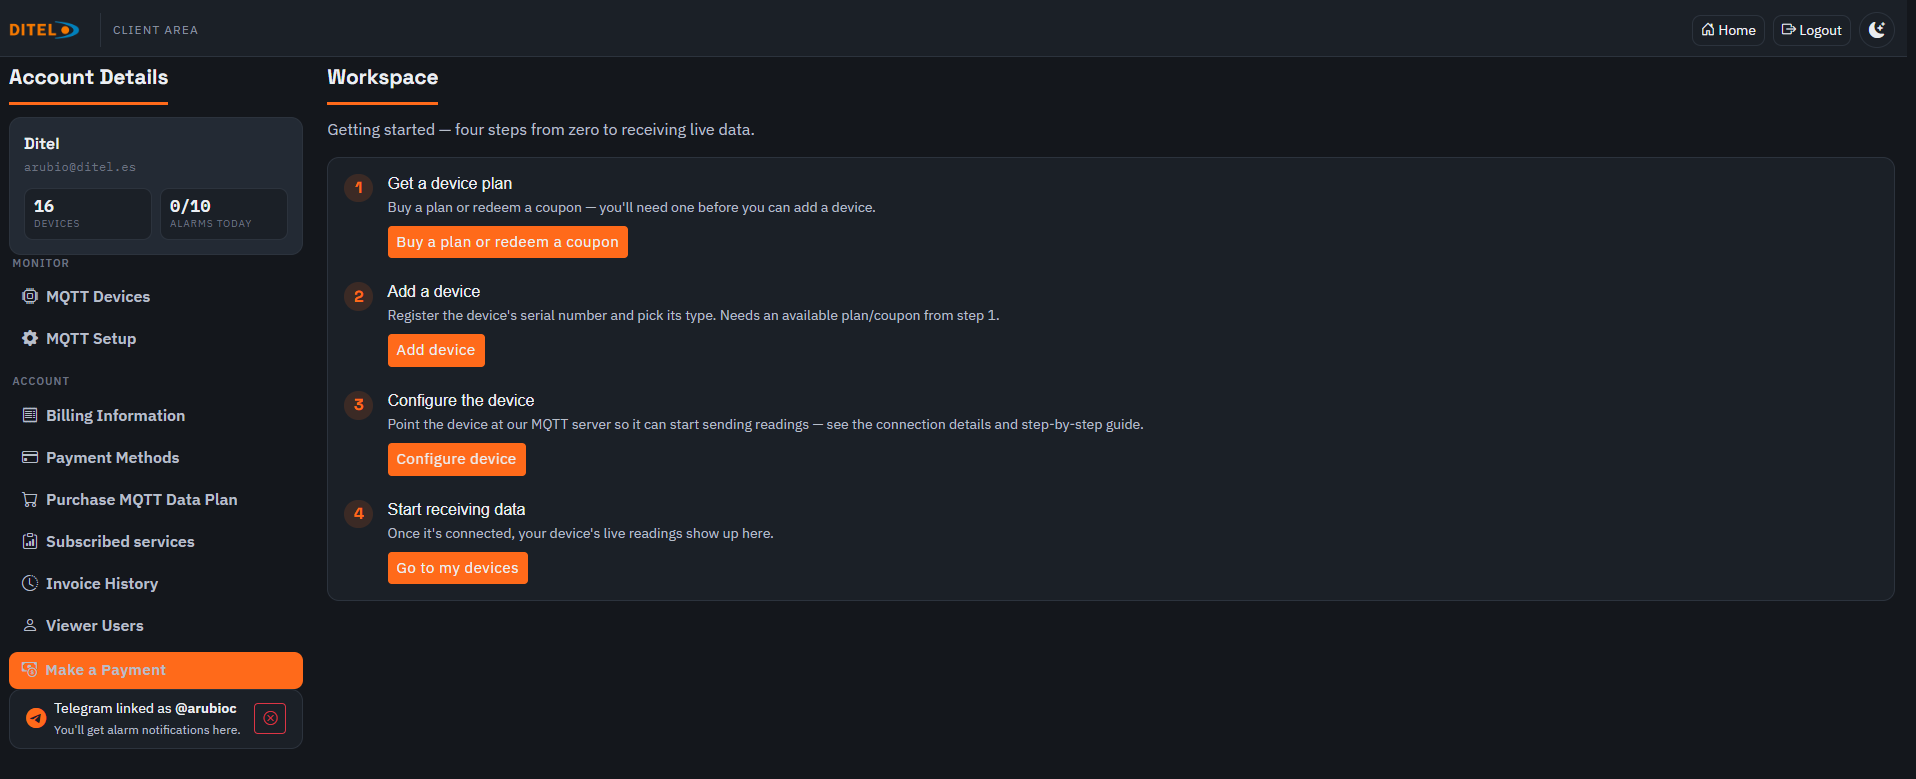
Below is the main screen of the Ditel Broker client area. This is the starting screen from which you'll manage your devices, settings and subscriptions.
Figure: Client area main screen
Left column: Account details
On the left side of the screen you'll find the Account Details section, showing:
Name: The name of the registered company or entity.
Email: The email address you signed up with, once verified.
Devices: The number of devices available for you to add.
Alarms: The number of alarms you can use per day (e.g. 9/10).
Below the account details you'll see a navigation menu giving access to the platform's different features:
MQTT Devices: Manage your registered devices.
MQTT Setup: Device configuration guide and quick access to the setup wizard.
Billing Information: View your billing details (a pending warning is shown with a warning icon).
Payment Methods: Add or edit your payment methods.
Purchase MQTT Data Plan: Buy a data plan to enable more devices.
Subscribed Services: Shows the services you're subscribed to (currently disabled in the image).
Invoice History: History of issued invoices.
Make a Payment: Highlighted red button to make a manual payment.
Telegram Linked: Shows whether your account is linked to Telegram and displays the linked alias.
Center column: Step-by-step guide
In the center of the screen you'll find a quick guide to get started with Ditel Broker and your MQTT devices:
Step 1: Get Started – Purchase a data plan or enter a valid coupon. This will increase your available device limit.
Step 2: Add a Device – Once you have credit or an active plan, you can add a new device.
Step 3: Configure your Device – Configure the device to send or receive data, following the specific manual for that device.
Step 4: Start Receiving Data – Once configured, the device will be ready to transmit or receive data over MQTT.
Whether your device acts as a publisher, a subscriber, or both, this guide will get you up and running quickly.
Linking your account to Telegram
Linking your Ditel Broker account to Telegram is highly recommended, since it lets you receive alarm notifications directly on your phone or computer through the well-known messaging app.
Besides receiving alarms, this integration lets you send MQTT commands directly from a Telegram chat using our bot, making quick actions and remote control easier without opening the web interface.
Accessing the bot
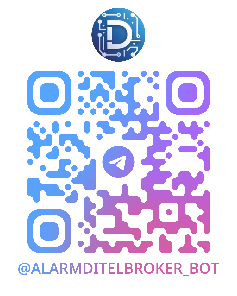
You can quickly reach the Ditel Broker bot by scanning the following QR code from your phone:
Scan to open the bot @alarmditelbroker_bot
How do I link my account?
Linking your account with Telegram is very simple. Just press the "Link Telegram" button in the client area (left column). This will generate a code like this one:
cli_xxxxxx
Copy that code and send it to the bot on Telegram. Once done, you'll get a confirmation that your account has been linked successfully.
Visual confirmation of a correctly linked account
From that point on, you'll receive alarms in real time and be able to use custom commands through the bot to interact with your MQTT system.
MQTT Device Management
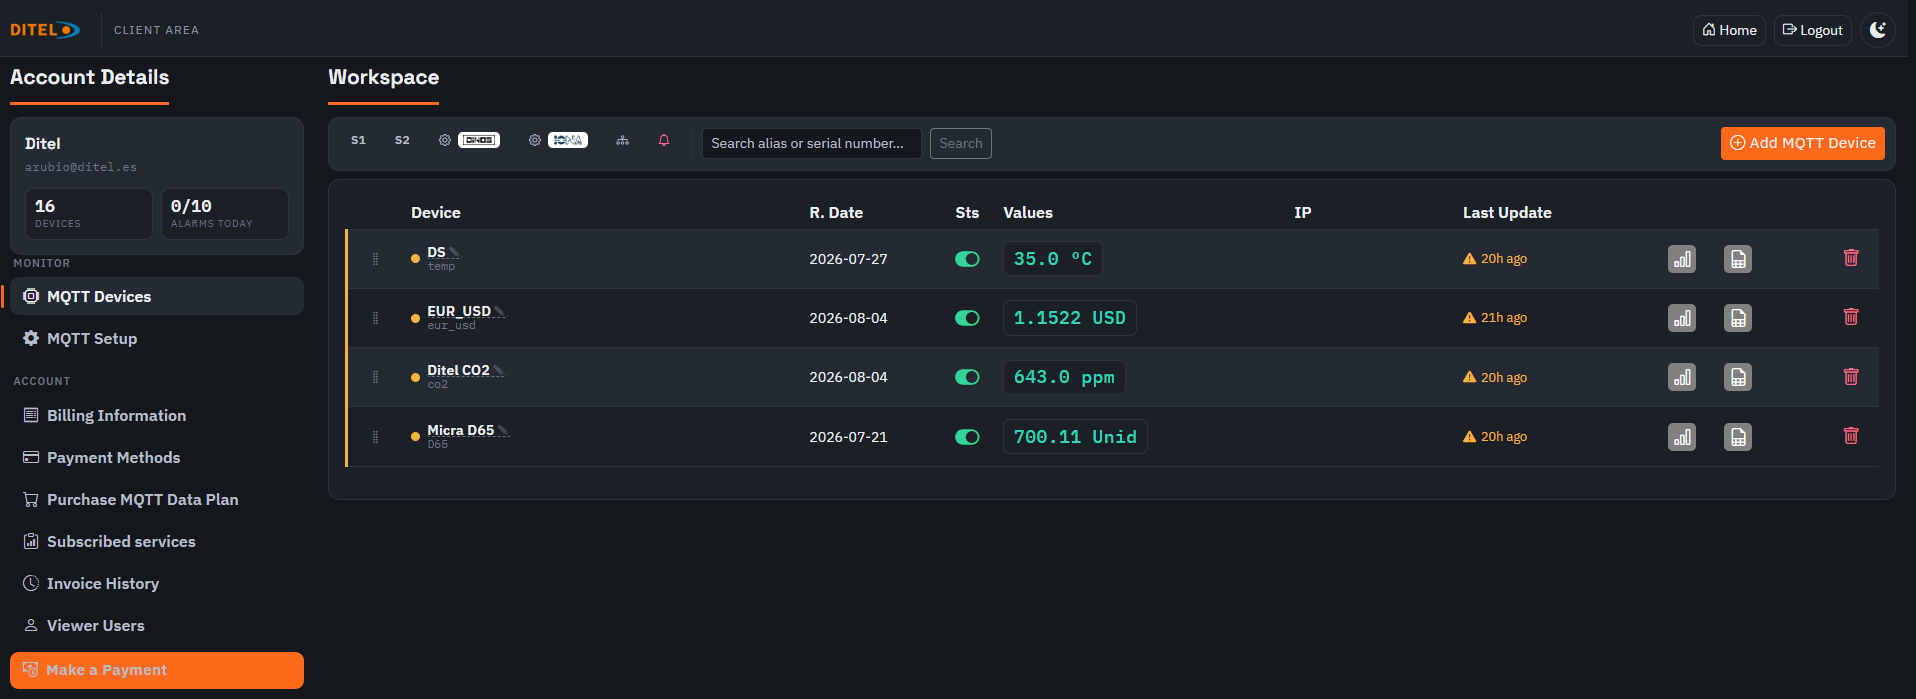
The MQTT Devices section lets you view and manage every device you've added to your account. It's equivalent to accessing it via the S1 button (simplified inline view mode).
Figure: Overview of connected devices
Main features of this view
Search box: At the top, you can search devices by alias, serial number or other fields.
+ Add MQTT Device: Lets you add a new device, if you have available credit.
Top buttons:
S1: Simplified view (current).
S2: Expanded view with more detail.
Dinos: Manage publishing schedules for DINOS-type devices.
Iona: Manage schedules for IONA devices.
Programación: Define output-activation rules based on inputs.
Alias: Custom device name to make it easier to identify. (editable)
S. Number: The device's serial number.
R. Date: The device's registration date in the system.
Sts: Device status (on/off), shown with a green switch.
Values: The device's latest received values. Text or numeric data depending on the type.
IP: The IP address the device last connected from.
This symbol may appear indicating its setup page is reachable from the same network
Last Update: Date and time of the last communication with the broker. "0000-00-00" means it hasn't sent data yet (shown with a ⚠️ warning).
Acciones: Icons for different actions:
Chart: View the history of received values as a chart.
Excel: Download the historical data as an Excel file (.xlsx).
Config file: Access the device's configuration file.
Delete: Remove the device from the system.
This view is optimized for quick, comfortable access to the essential information for each device. If you need more detail or controls, you can use the S2 view or the dedicated scheduling and alarm options.
Expanded View Mode (S2)
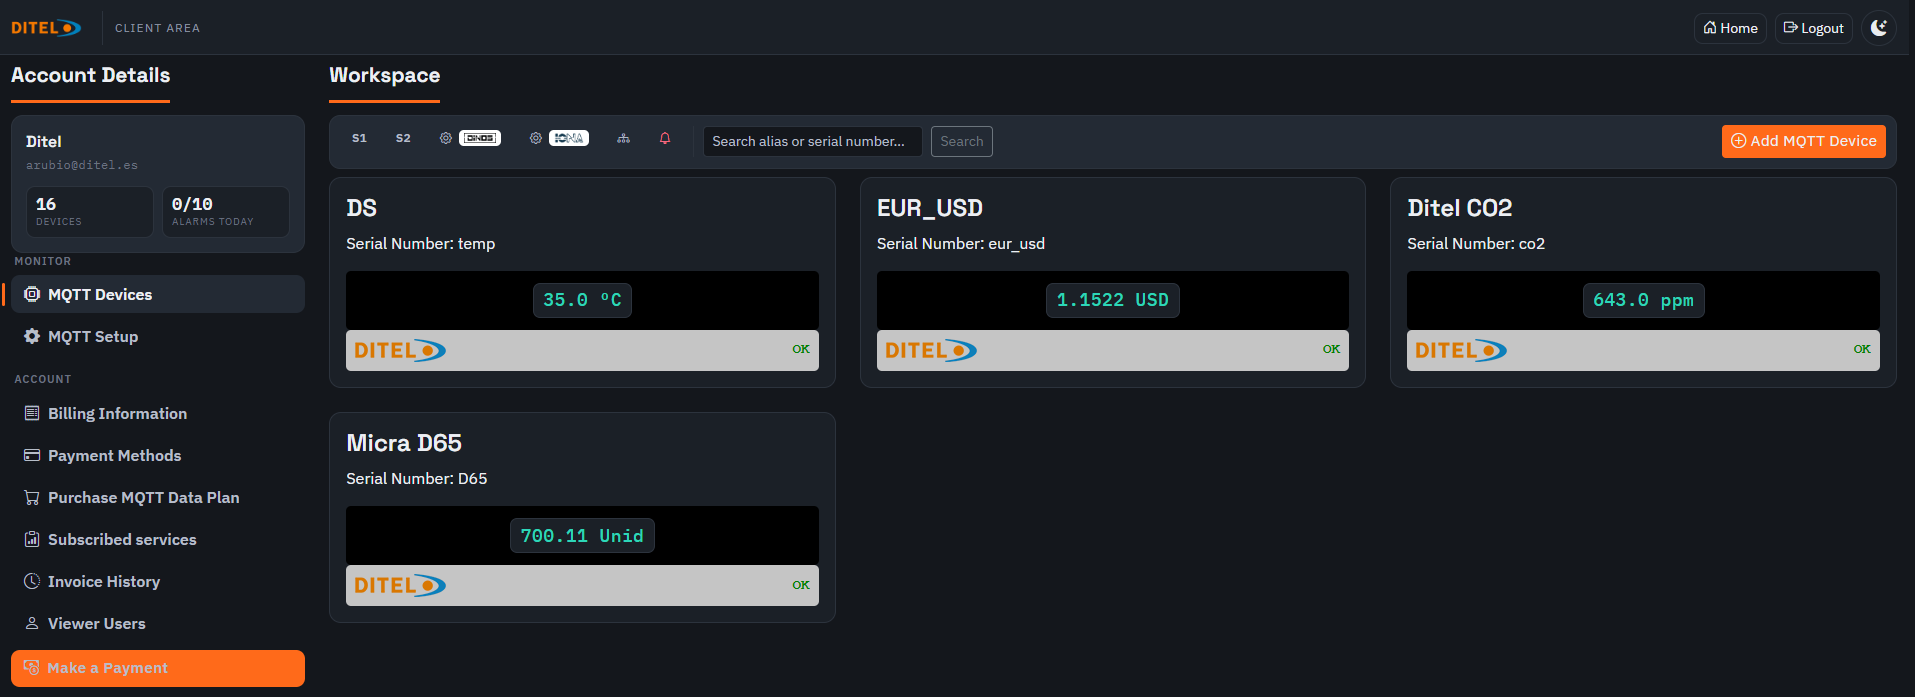
The S2 view in Ditel Broker offers an expanded presentation of your connected devices, ideal for users who need more detailed monitoring or a clearer visual interface for manual control.
Figure: Expanded view of MQTT devices
Differences from the S1 view
Each device is shown as its own "widget" card, with more room and better visibility.
Received values are shown in a large digital style with highlighted colors (red, blue, orange), making them easier to read from a distance.
For some devices, a manual input is enabled through a text field and a Send button.
Parts of each device's card
Alias and Serial Number: Clearly shown at the top for quick identification.
Digital display: Black display area showing text or values depending on the device (e.g.: HOLA, 29.8°, TEST6).
Type button: Shows whether it's a DINOS, IONA or other device, with visual identification through the matching logo.
Data input: For devices that support it (e.g. DINOS), a Your text... or Your number... field is shown, followed by a red Send button. This lets you send MQTT data manually.
Examples of devices shown
Dinos_1L / 1N6 / 1N4: Let you enter text or numbers manually. Ideal for message displays.
IONA Wireless units: Show numeric values such as temperature and humidity. Includes signal and battery indicators.
Micra-M Max: Shows an advanced display with data such as:
Main value
Max / min
Configured setpoints (SET1 to SET4)
The S2 view is especially useful in industrial settings or control rooms where a quick, clear glance at device status is needed, with the added option to interact with them directly.
Scheduling Messages for DINOS Displays
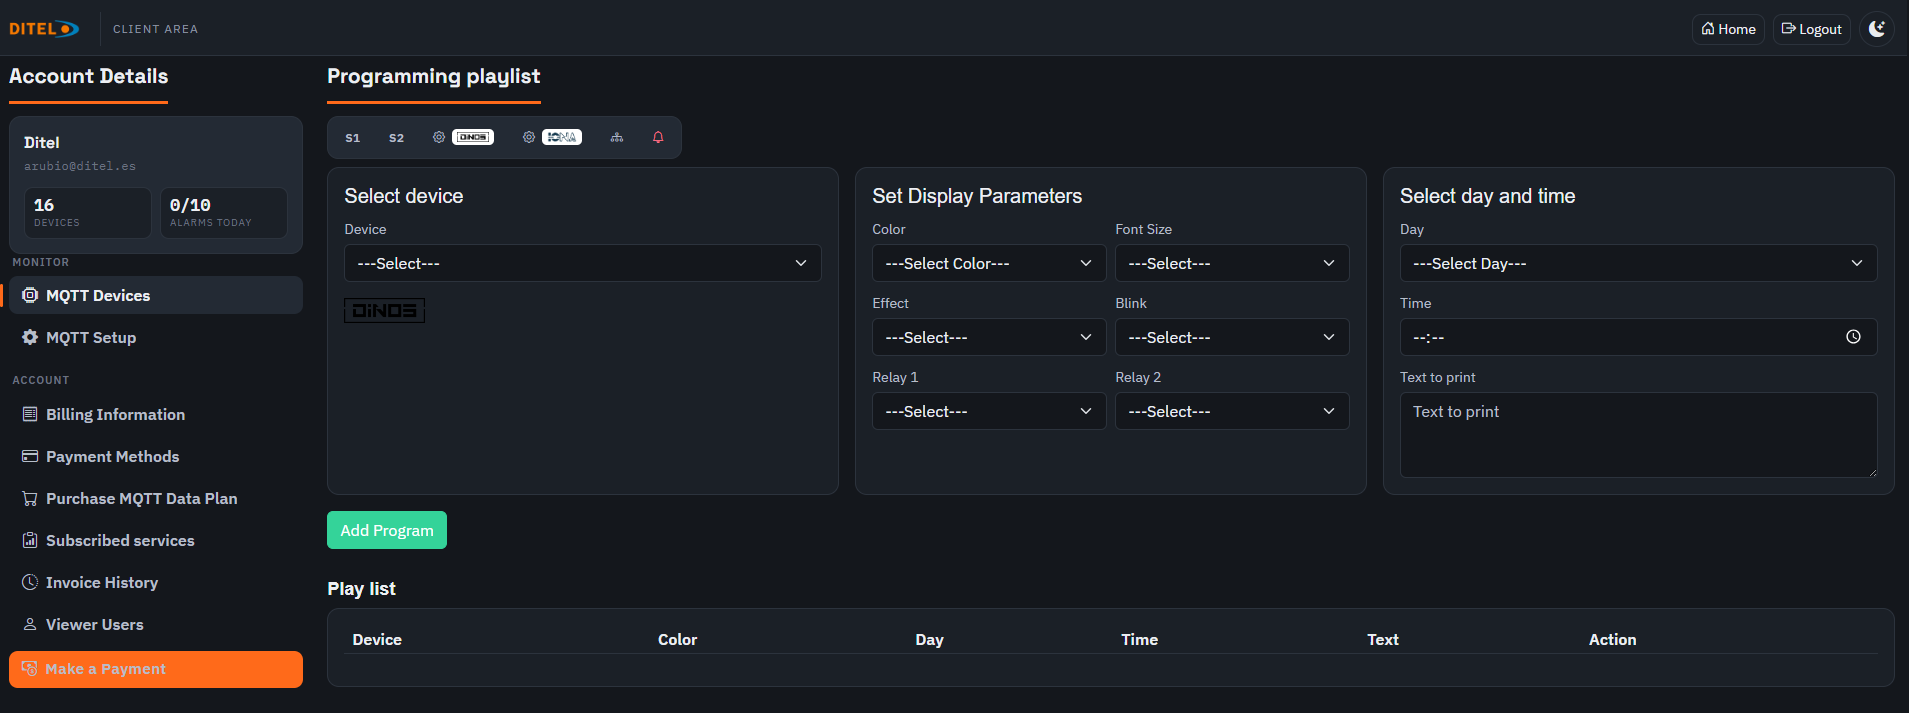
Figure: Interface to build a message playlist on DINOS displays
DINOS devices are large-format displays that show messages clearly and visibly in industrial environments. This section of the platform lets you build an output playlist that runs on a schedule, based on the day, time and display parameters you configure.
How does it work?
From this screen you can define which message to show, on which device, in which style, and at what time. It's ideal for reporting production status, warnings, shift changes, alerts, or any other important information that should be shown automatically.
Step by step:
Select Device: Pick the DINOS device you want to send the scheduled message to. Only devices available on your account are shown.
Set Display Parameters: Here you define how the message will look:
Color: Text color to display.
Font Size: Font size.
Effect: Visual effect such as scroll or blink.
Blink: Whether the message should blink or not.
Relay 1 / Relay 2: Lets you activate the device's relays along with the message (if available).
Select Day and Time: Set the day of the week and exact time the message should be shown.
Text to Print: Enter the text you want to display. This is the content that will appear on the display.
Click on "Add Program": Once every field is filled in, press this button to add the schedule to the active list.
Schedule list
Below the form you'll see a table with every currently scheduled action. Each row shows:
Device: Name or identifier of the scheduled device.
Color: Color code assigned to the message.
Day: Day of the week it will run.
Time: Scheduled time.
Text: Content that will be shown on screen.
Action:Delete button to remove the schedule if it's no longer needed.
This tool turns DINOS displays into extremely useful automated communication devices, with no need for real-time human interaction.
Scheduling Messages for IONA Devices
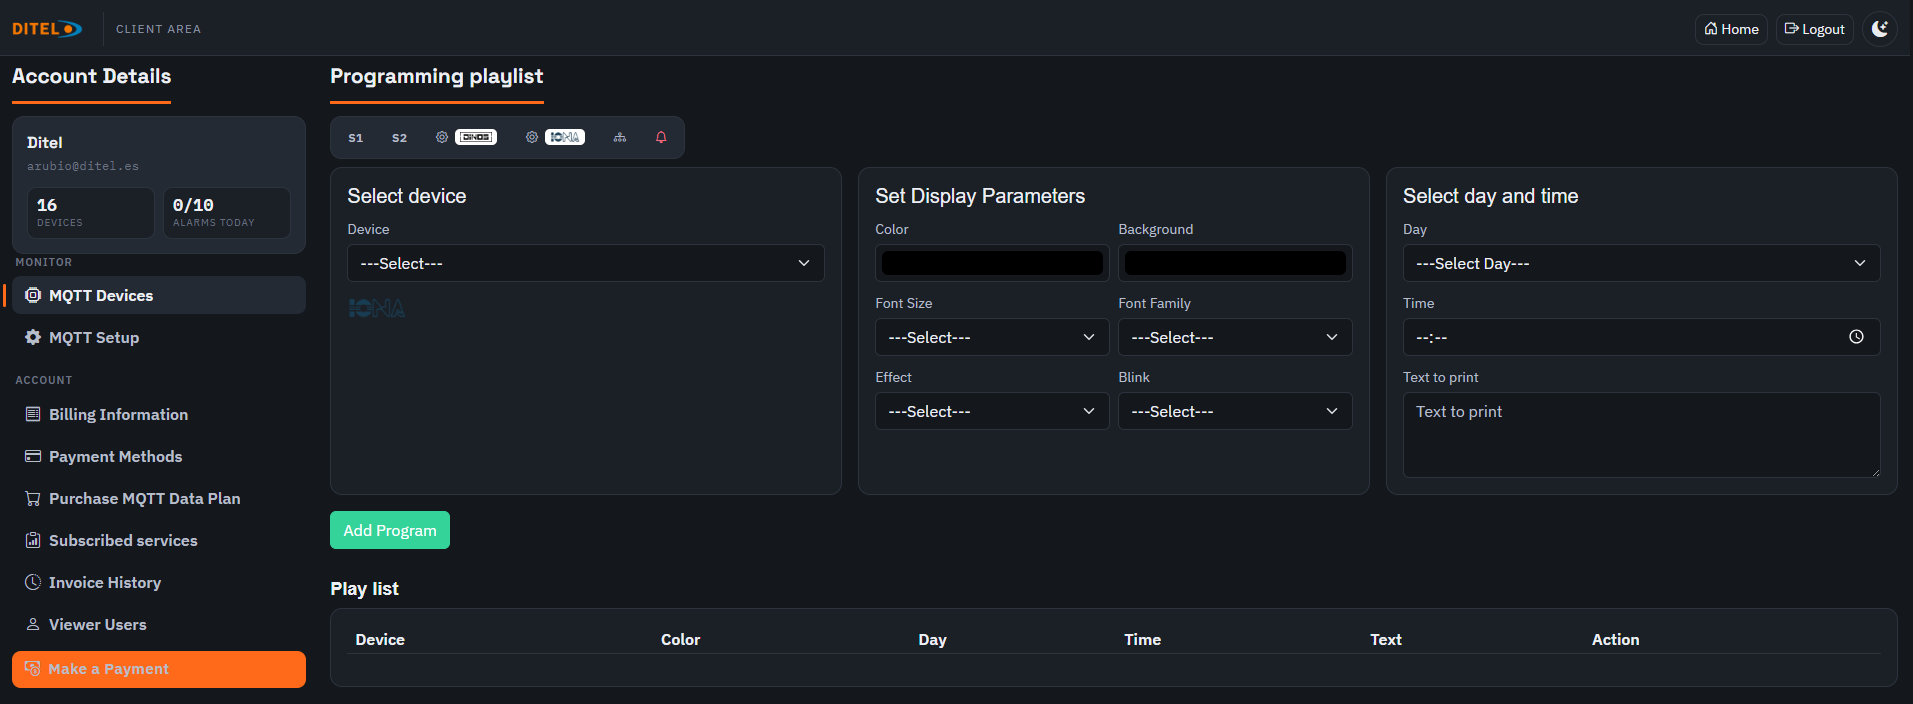
Figure: Interface to build a message playlist on IONA devices
IONA units are advanced display-and-control devices that combine MQTT subscriber and publisher functions, making them a clear example of a hybrid device. They can receive data such as temperature, humidity or CO2 levels, while at the same time publishing visual messages straight to their screen, either manually or on a schedule. From this interface you can build a scheduled output playlist to show specific messages at particular times of the week, making them ideal for environments that need both monitoring and active communication.
General operation
This screen lets you define output messages with configurable visual style and specific time slots. Ideal for automating information, alarms, or internal communications in industrial, logistics or administrative settings.
Step by step:
Select Device: Choose the IONA device you want to schedule messages for. Only devices available on your account are shown.
Set Display Parameters: Customize how the message will look:
Color: Main text color.
Background: Message screen background color.
Font Size: Text size (more options than DINOS).
Font Family: Font style.
Effect: Appearance or scrolling effects.
Blink: Message blink setting.
Select Day and Time: Set the day of the week and exact time the message should appear.
Text to Print: Write the message you want to show on the display.
Click on "Add Program": Saves the scheduled action to the active list.
Schedule list
Just like with DINOS, below the form you'll see the current Play list, with each row showing:
Device: Identifier of the selected IONA device.
Color: Color assigned to the message, in hex format.
Day: Day it will run.
Time: Exact time of the event.
Text: Text content that will be shown on screen.
Action:Delete button to remove the scheduled action.
This feature turns IONA devices into powerful automated information panels, fully adaptable to environments with dynamic communication needs.
Rule Scheduling: Outputs Based on Input Conditions
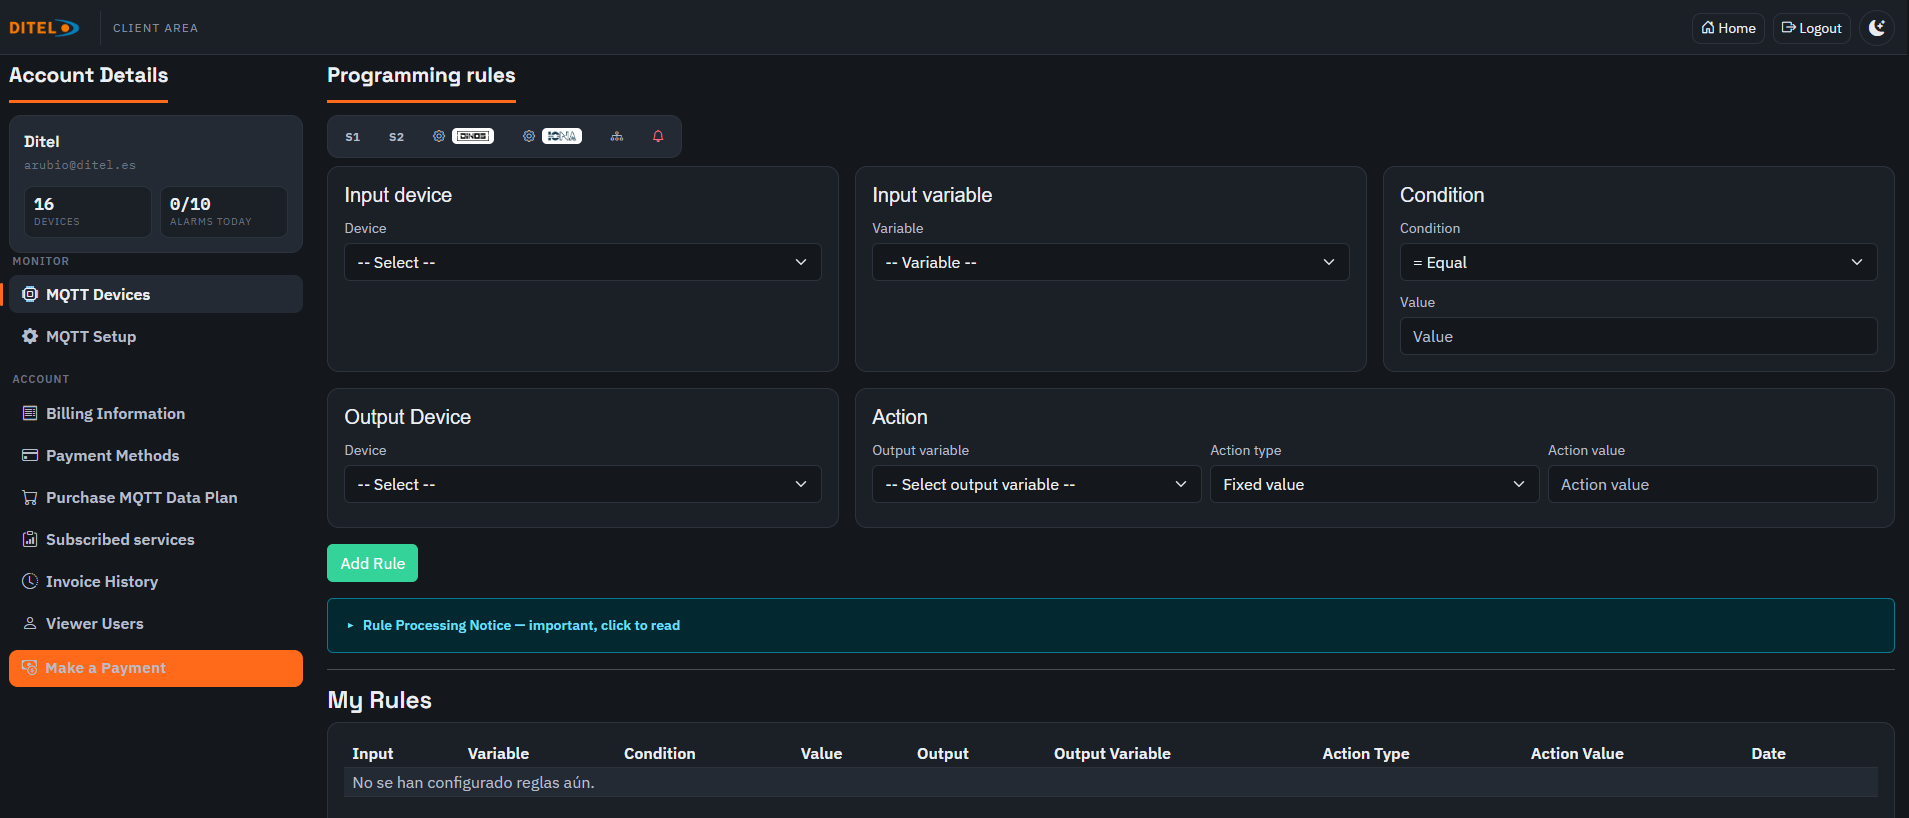
Figure: Interface to define conditional rules between devices
This section lets you create automated rules that trigger actions (outputs) when certain conditions based on a device's input values are met. It's a powerful tool for scenarios where you need to activate outputs, show messages, or change states based on logical conditions.
How it works
Each rule is built by picking an input device, one of its available variables, a condition (e.g. equals, less than, greater than, etc.) and a comparison value. If the condition is met, an action is triggered on an output device.
Main components:
Input Device: The device providing the input variable. Depending on the model selected, different available variables will be shown (e.g. temperature, analog value, text, etc.).
Input Variable: The specific variable from the input device used as the basis for the condition.
Condition: Type of logical comparison: equals, greater than, less than, not equal, etc.
Value: The reference value used to compare against the variable.
Output Device: The device the action will run on if the condition is met.
Action: Lets you pick an output variable and define the type of action to run. It can be:
fixed value: Publish a specific value (e.g. "ON", "OFF", "Text")
copy: Replicates the input value
Keep in mind that each device can have different input and output variables. For example, a sensor may offer temperature, humidity and CO2 as inputs, while a DINOS display may have text and relay variables as outputs.
If you want to run several actions on the same output device (e.g. show a message and activate a relay), you'll need to create a separate rule for each action.
Managing existing rules
At the bottom of the screen you'll find the My Rules table, showing every active rule. Each row details:
Input / Variable: Input device and variable being evaluated.
Condition / Value: Logic and value that must be met.
Output / Output Variable: Device and variable affected by the rule.
Action Type / Value Acción: Type of action and value to run.
Date: Date and time the rule was created.
Action:Delete button to remove rules you no longer need, or edit them later.
This tool provides basic but powerful control, ideal for light automations. It isn't designed for real-time control; for critical systems, dedicated industrial controllers or PLCs are recommended.
Alarm Management
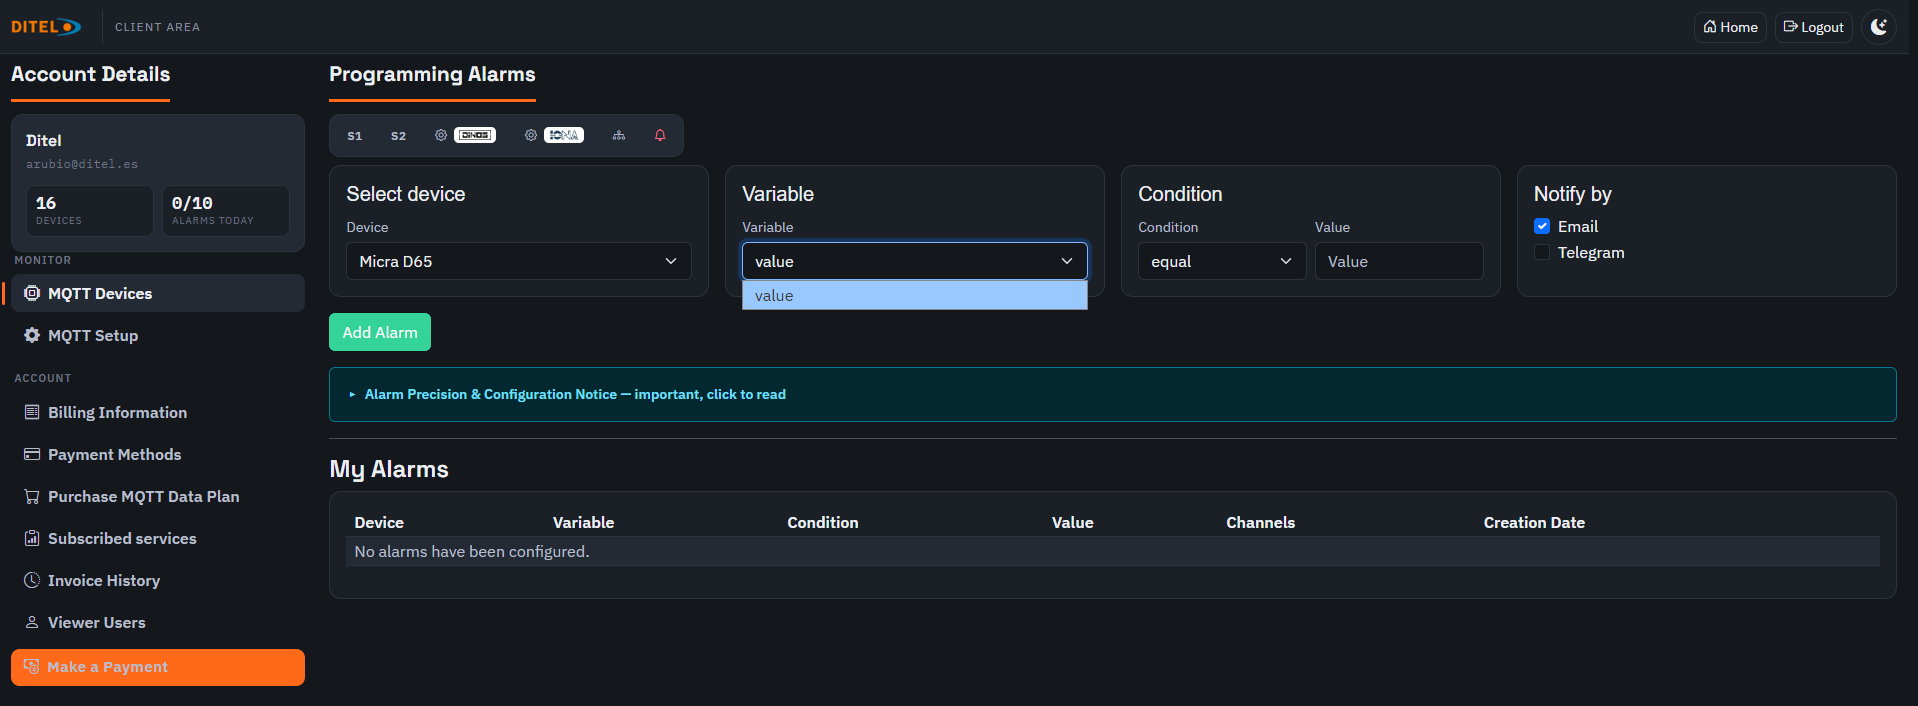
Figure: Configuring alarm conditions per variable
The alarm system lets you define critical conditions for one or more of your devices' variables, so you can get an immediate alert when certain limits are exceeded. These alarms can help you prevent failures, react to out-of-range conditions, or monitor sensitive states.
How do I configure an alarm?
Select device: Pick the device you want to set the alarm on.
Variable: Choose one of the available variables for that device (e.g. temperature, humidity, signal or battery).
Condition: Define the comparison type (equals, greater than, less than, etc.).
Value: Set the value that will be used as the trigger threshold.
Add Alarm: Click the button to save the configuration. The alarm will be added to the active list.
Receiving alerts
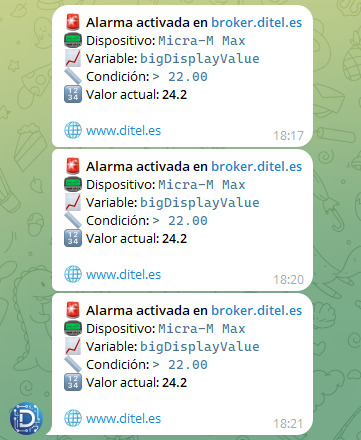
When an alarm triggers, the system will send a notification to the email address linked to your account, and if you've linked your account to Telegram, you'll also get the alert there.
Figure: Alarm received via Telegram
Important note on sending limits
To avoid message overload (spam), the following daily limits apply:
Email: Maximum of 10 alarms per day.
Telegram: Maximum of 15 alarms per day.
If this limit is exceeded, no further notifications will be sent until the next day. That's why it's important to set your alarm conditions correctly, so they only trigger for truly significant situations, avoiding a constant stream of alerts that could become counterproductive.
List of configured alarms
At the bottom of the screen, a table shows every active alarm, indicating:
Device / Variable: Device and variable the condition is evaluated on.
Condition / Value: Logic and value set to trigger the alarm.
Email Notification: Email that will receive the alert.
Creation Date: Date the alarm was configured.
Action:Delete button to remove the alarm once it's no longer needed.
Sending Messages to Devices from Telegram
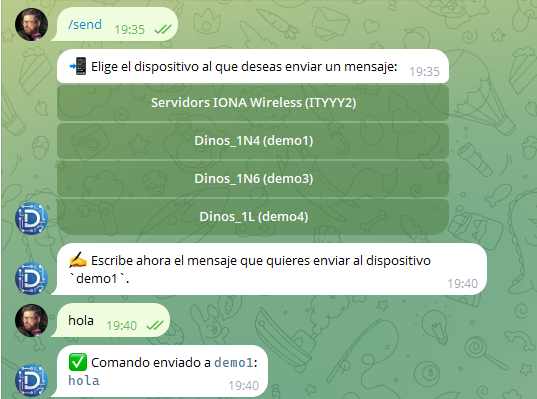
Figure: The /send command in use from Telegram
One of Ditel Broker's most powerful features is the ability to send messages to your devices directly from Telegram. This lets you act on DINOS or IONA displays without opening the web interface — ideal for quick replies or urgent communications.
How does it work?
To send text to an output device from Telegram, simply use the command:
/send
Once you do, the Ditel Broker bot will automatically show a list of the output-capable devices registered on your account.
Pick the device from the list shown (e.g. Dinos_1N4 (demo1)).
Enter the message you want to send. It can be free text, such as hola.
Confirmation: The bot will send you a message confirming the command was sent to the selected device.
This process is fully interactive and designed to be easy to use, even from mobile devices. It's ideal for operators or technicians who need to change panel messages quickly and remotely.
Keep in mind: only devices configured as outputs (such as DINOS or IONA displays) will show up in the list. If a device can't display messages, it won't be available for this feature.
MQTT Communications Setup
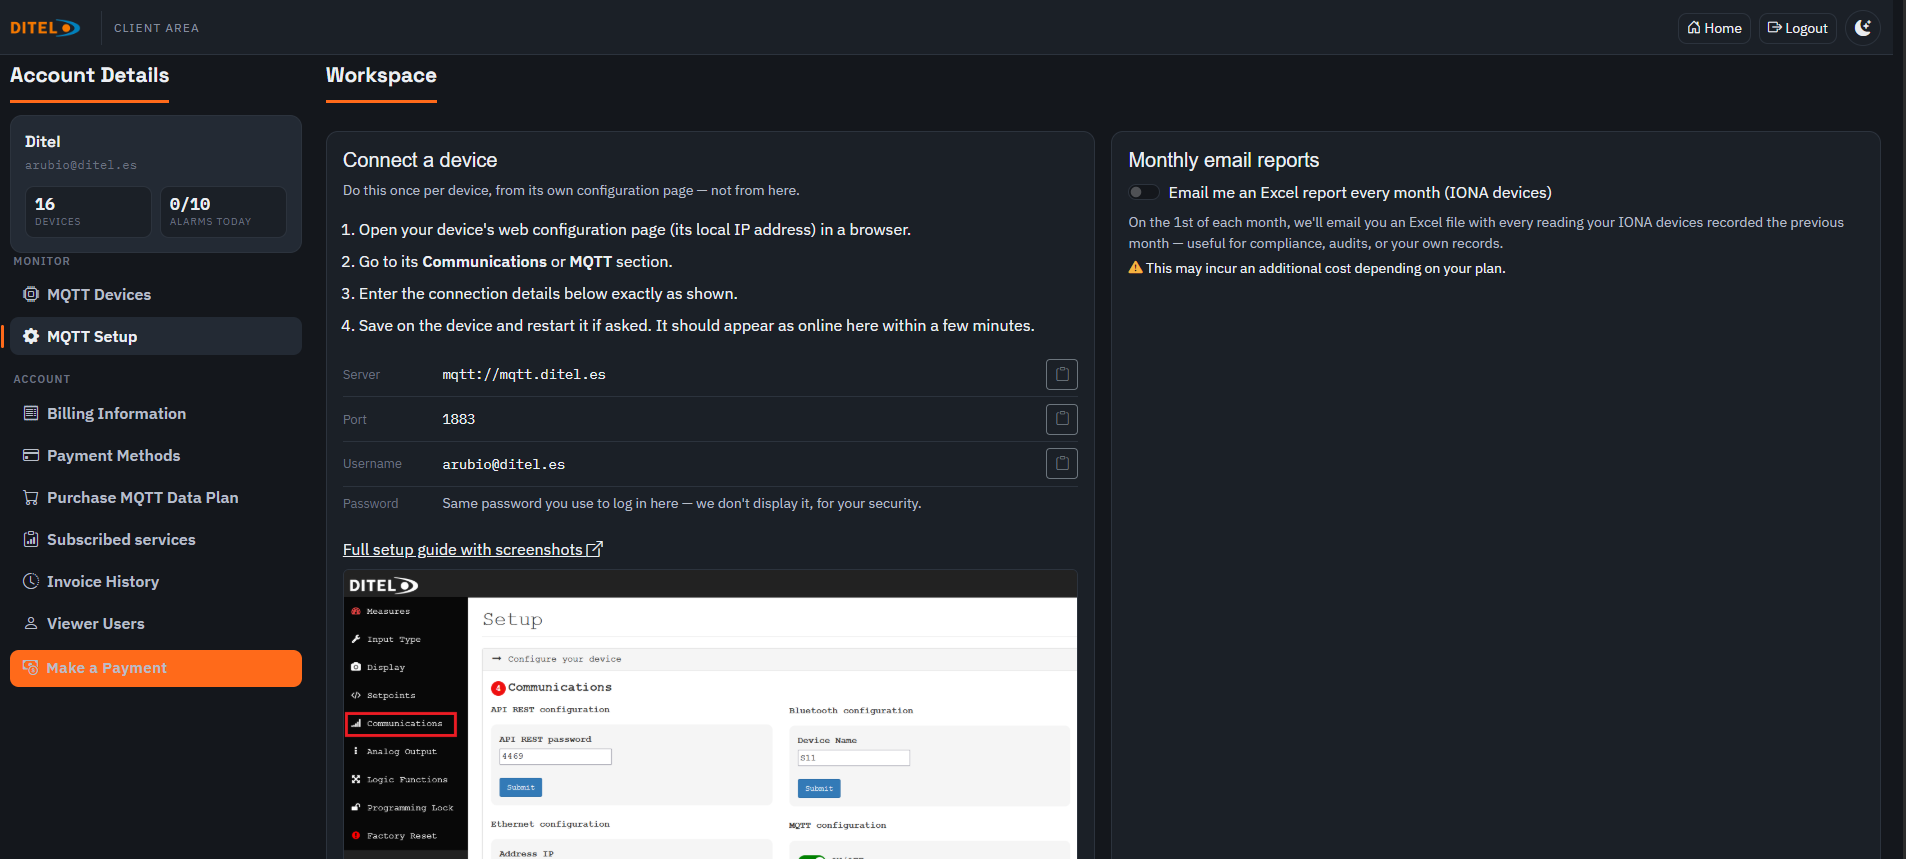
Figure: Example configuration on the device's web interface
This section provides the instructions needed to connect your device to Ditel Broker over MQTT. Configuration is done through the device's own web interface (such as https://micramax.ditel.es/webserver), under the Communications section.
MQTT connection parameters
The fields you need to fill in on your device are:
Once you've entered these details, click Submit to save the changes and start communicating with the Ditel Broker server.
Additional settings (IONA)
On the right side of the screen there's an extra option for IONA devices, letting you enable monthly Excel report delivery:
Checking "Send monthly Excel report with last month's device readings by email" will send you an Excel file with the data recorded by the device over the previous month.
The report is sent automatically on the 1st of each month to the email linked to the account.
Note: This service may involve an extra cost depending on your plan.
This setup is essential for your devices to communicate correctly with the Ditel ecosystem and start sending or receiving data over MQTT.
Billing Information
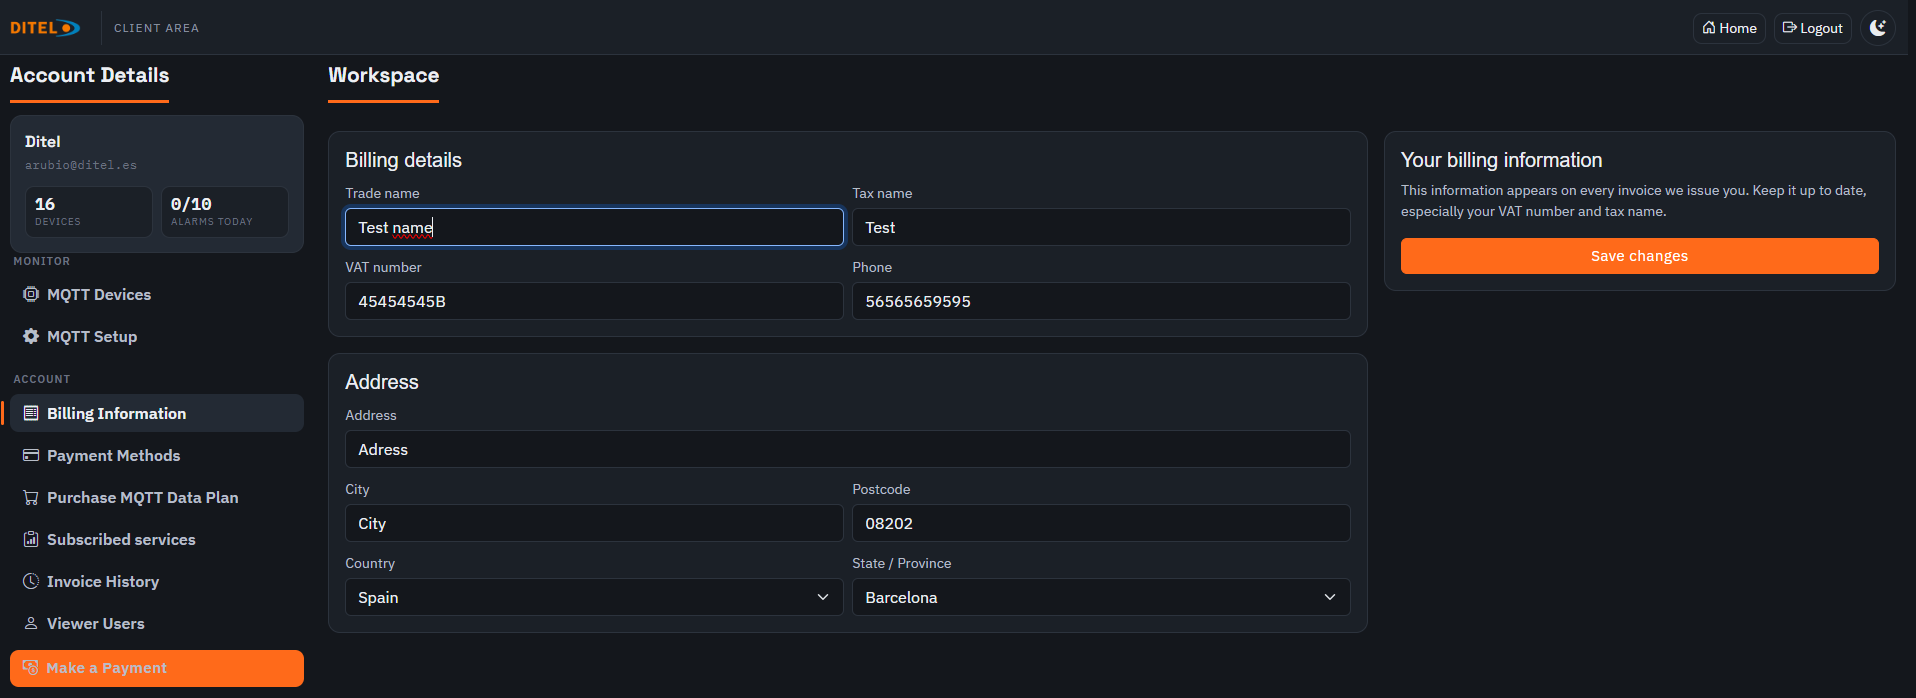
Figure: Form to enter your billing tax details
If you want invoices to be issued in your company's name, you must fill in every field under Billing Information correctly. This section is accessible from the left-hand side menu.
The warning icon on the Billing Information button means some tax details are missing or incorrect, so the system won't be able to issue a valid invoice until they're fixed.
Required fields
Trade Name: The company's trade name.
Tax Name: The company's legal name, or the individual's full name.
VAT Number: Tax ID number (NIF/CIF/VAT ID).
Address: Tax address.
City: City.
Country: Country.
Post Code: Postal code.
State: State or province (if applicable).
Phone: Contact phone (optional, but recommended).
Once every field is filled in, click "Save" to save your details. From that point on, issued invoices will include this information.
Keep in mind: if you don't enter this information, the system won't be able to generate invoices correctly under your company's name, and will use the generic default identifier instead.
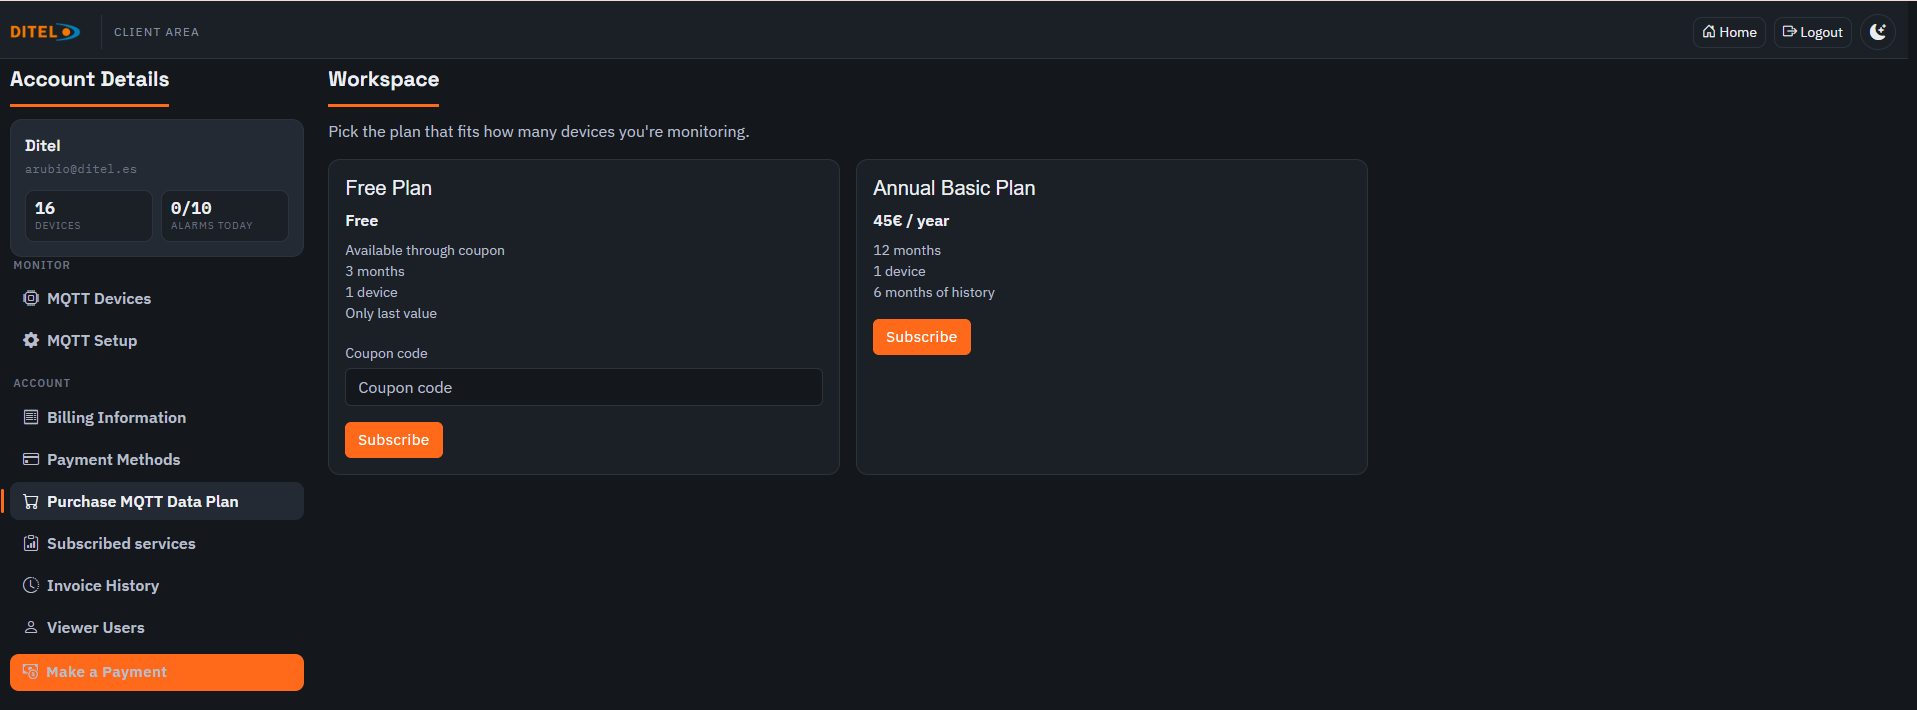
MQTT Subscription Plans
Figure: MQTT plan activation section in the user account
In this section you can activate your MQTT subscription to register and use devices on the Ditel Broker platform. Access it from the side menu with the Purchase MQTT Data Plan button.
Available plans
✅ Free Plan
Only available with a coupon code.
Duration: 3 months.
Lets you register 1 device.
Only keeps the last received value, no history included.
Some of our devices ship with a free coupon you can redeem here. Just enter the code in the Coupon code field and press Subscribe.
📦 Annual Basic Plan
Price: €45/year.
Duration: 12 months.
Lets you register 1 device.
Includes up to 6 months of historical data.
For users who need a more complete service and historical data continuity, this annual plan is the recommended option.
Keep in mind that you need at least one active plan to activate any device on the platform. If your plan expires or you haven't activated one, you won't be able to register new devices or receive MQTT data.
Note: Plan activation is immediate, but invoice generation may take a few minutes. To make a payment, the invoice needs to already be generated and available in your history.